Saturday, May 23, 2020

Living Room Entertainment and Reasons Not to Document it


Last night my creative little heart invited us to an evening of entertainment. His act: stand-up comedy. He has spent a lot of time during this quarantine creating funny videos and comic strips. He enjoys a standing weekly date with his Mimi on Sunday nights where they watch Americas Funniest Videos together virtually while on facetime. It made me think about how important it is to find reasons to laugh during this time of  quarantine that is so full of heavy, serious, scary, dull and boring moments.
Watching my son enter the room in a fun outfit he put together, carrying a mic made of tinker toys reminded me of my child hood. My sister and I would put on performances for my parents friends and our family. We would push the coffee table out of the way and sing and dance. I recall one time when I played the piano keyboard for my grandparents. When I was done they clapped and said, “Encore, play us another!” I only knew one song so I started playing it again and my Grampy said to my Gram, “I thought she was going to play another song, a different song!” She elbowed him in the ribs and while smiling, nodded at me to continue.
These are some of my best childhood memories. I purposely have no images or video from last night’s comedy show to share with you because I promised my son that I would keep that private, just for family, but it got me to thinking: How much does sharing video and images of these moments alter them? How unencumbered were my sister and I when we twirled and danced without fear that it would be posted publicly? How freeing is that to have these moments as memories without being publicly documented?
Tina Fey shared on The Tonight Show a few weeks ago that her kids and some of their cousins and friends kids put on a talent show virtually using video conferencing. She said it was a great way to get the kids off their screens every once in a while. (If you’ve been parenting through this quarantine you know the struggle to limit screen time while distance learning on the internet and the easy access to hours of streaming entertainment. The struggle is real!) Anyway, Fey said that she loved being able to send them off to practice for the talent show. My older son created a video clip of himself playing guitar for his schools virtual talent show. Sharing these memories through the technology available is a fun way to keep us somewhat connected while forced to stay apart.
I organized some of my own students (and a few brave teachers) to submit video clips of them dancing to a song they all knew from school that had motions. Some students really enjoyed it and others were good sports and participated out of obligation. I only shared it with our small school community, but still the fear of documenting something potentially silly deterred some students from enjoying participating and prevented others from joining in at all.
I guess my muse about at home live entertainment this morning is that I want to encourage families to create space this summer for their kids to put on a show completely undocumented. Give them your full attention and allow them the gift of being able to take the risk of being silly or performing in front of you without the anxiety of it being archived on social media. Sit back, relax and enjoy the show.

Sunday, May 17, 2020

Five Tips for Sticking to a Summer Art Challenge


Image
A quick google search for "summer art challenge" yielded
over 68,000 results
Art challenges can be a great way to motivate creativity this summer! Do a quick search on Google or Pinterest and you can find lots of graphically engaging lists of prompts for making all kinds of art. Here are five tips for successfully sticking to your challenge.

1. Set your own challenge for yourself. Challenges are generally more successful when you choose it for yourself and are personally invested in the challenge. If someone else sets the goal for you, it becomes less about something you want to achieve and more about pleasing someone else.

2. Set an attainable goal. A goal to do something daily is great if you actually have the time and motivation to do it. If the goal is too strict or difficult to accomplish it might not be attainable. Instead of a daily goal maybe set a goal to engage in art 5 out of 7 days in a week for a month. That way if you miss a day, you won’t get too discouraged or give up. Try making it a weekly goal instead of a daily goal. Or set a shorter time frame (for example, draw every day for a week rather than every day for the whole summer) Try setting multiple short term goals for the summer.

3. Set a goal that is specific and measurable. Wanting to improve your skills is great! But making vague goals like: this summer I am going to get better at drawing or this summer I’m going to do more drawing are not measurable goals. How will you know if you reach that goal? Instead, try being more specific. For example, this summer I am going to draw in my sketchbook 5 days out of every week.

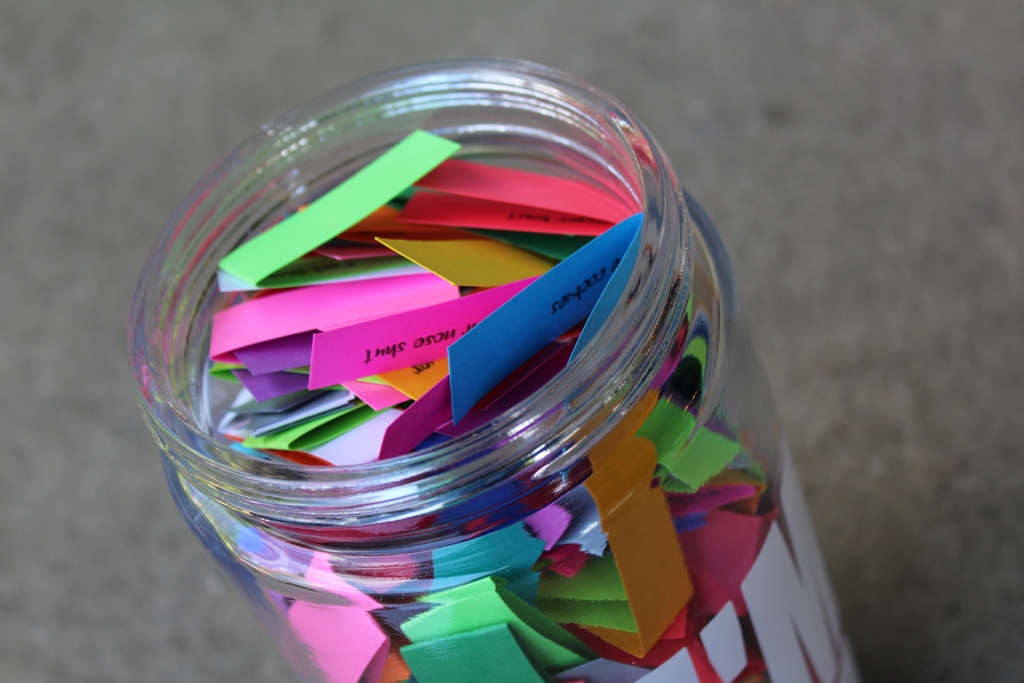
Giveaway: Linette's Boredom Jar - Confessions4. Select a format that works best for you. Really specific challenges can be great because they pushed me conceptually and forced me to illustrated a specific theme each day, but if that sounds too restrictive and you’d become frustrated or bored try an idea jar instead. Take a challenge you find online and cut up each prompt into separate papers and place them in a jar. When you want a prompt for your artwork, select three ideas from the jar and choose one of them. This adds more freedom for you to choose and may help you stick to your goal.

5. Be held accountable If no one knows you are doing the challenge you might find it easy to let it slide when you hit a plateau or a wall. Instead find someway to be held accountable. Let someone know what your goal is and check in with them to share how you are progressing. Maybe post images on social media or find another outlet to create mini deadlines for yourself like participating in Illustration Friday where you submit a drawing on a weekly basis.

Whatever your challenge is for the summer have fun with it, be realistic and extend yourself some grace if you slide off course. Art can be a great way to relieve stress and anxiety. You owe it to yourself to spend some time making art this summer. How will you challenge yourself?


Found Objects for a Miniature Garden


Ceramic fairy garden house nestled in our
herb garden made by Brookye Keeney
Ever since I read “The Borrowers” as a child I have loved miniature things and the idea of an imaginary world where things are made from found objects. A friend of my parents had a doll house called “The Mouse House” which was made from a hollowed out log. A section of the trunk was removed so you could see the toy mice living inside and all their tiny furnishings. The local pizza place in my hometown had a huge doll house display in their take out area where I could look at the miniature village while waiting for my family’s order. As an adult I worked as a seasonal sales associate at A.C. Moore one Christmas. My favorite job at closing time was to return the back shop from the miniature doll house section. So as you can tell it’s an interest that has stuck with me!

No photo description available.
My little creative hearts building a
fairy garden at their Mimi's house
Making a miniature garden is a great summertime activity. It can be an ongoing project that can be added onto through out the summer and a place for kids to engage in screen free imaginary play! The internet is full of inspiration and the theme of your garden is totally up to you! Fairy gardens are very popular, but if fairies aren’t of interest to you there are examples of dinosaur, lego, train, beach and camping themed miniature gardens too. Use found man-made objects like buttons, thimbles, silk flowers, and glass marbles or beads and natural found objects like pebbles, seashells, acorns and tree bark. Fashion them together with glue, and wire and add details and embellishments with paint, permanent marker, and polymer clay.
Brainstorm with your kids about:
  • location (an out of the way spot in your back yard or a place where neighbors frequently walk past and can enjoy)
  • dwellings (houses, buildings, tents, caves etc)
  • a layout for pathways, creeks, bridges and ladders
  • everyday activities (hanging laundry out to dry, cooking - maybe over a campfire)
  • recreational activities (fishing, boating, swing set)
  • relaxing places for your imaginary beings to spend time (bench, hammock)
  • Accessories (signage, lights, small plants and moss that you can grow, plastic dinosaurs or lego characters)

When choosing a location come up with a spot that is agreeable to everyone and set boundaries of where the edges of the miniature garden are so it stays somewhat contained. For example, your miniature garden could be in a shady spot where kids can retreat to play on a hot day, or a container garden on a porch. Think about what it’s purpose is and how it will be enjoyed.

Miniature bistro table and chairs made from buttons with
a silk flower umbrella, fashioned together with wire.
Pay attention while on walks in your neighborhood or while spending time in your backyard. Have a bag or box handy to collect found objects in until you are ready to create. Keep an eye out for abandoned objects around the house like old flower pots, fruit pits, seashells from that last trip to the beach, spare buttons, glass marbles, scraps of cloth and other treasures that can be used in your miniature garden. This is also a great opportunity to teach kids about re-using and re-purposing. Remind kids that before using an object, they should get permission from an adult if it is an object that doesn’t belong to them.

I hope this post inspires you to create your own miniature garden and engage with it all summer long!


Saturday, March 28, 2020

Reflections on Parenting During Quarantine


During this time of quarantine, I’ve noticed an abundance of free subscriptions and memberships being poured out by all kinds of educational resources. The generosity is heartwarming, but as a parent sifting through it all I find it mind boggling. There is no way I could take advantage of it all and I wouldn’t be doing my kids a service by trying. Luckily my kids are receiving quality academic and enrichment from their public school teachers. My children have had plenty to do without being overwhelmed by school work or becoming bored. I appreciate the quality of the assignments that peak interest and keep their minds engaged. We have not received any assignments that I would classify as busy work. Leaning on my child’s teachers to provide their academic learning alleviates the fatigue I will surely experience if I try to take advantage of every educational offer out there right now.

As an art teacher myself I feel like a curator for my school’s families. It’s my job to sift out something meaningful for my students to engage in each week. I encourage you to use your child’s teacher as a primary resource. Let them curate each weeks learning experiences. Of course there are people who, for a variety of reasons may need to take a larger role in their child’s education right now.

As families find themselves housebound, I think some parents are feeling a bit overwhelmed as they figure out how to facilitate their child’s learning. I appreciated this article Tips for Homeschooling During Coronavirus published by NPR. This is a great opportunity for our kids to pursue their interests deeply. 

“Bonus: If it's something they're truly interested in, you won't have to bug them to do it.” - Ana Homayoun, educational coach

My biggest take aways from these first two weeks parenting in quarantine:
Guide your child as they set the schedule for the day. We set up an hourly schedule on the glass french doors in our kitchen. Using crayola window markers I help my kids map out the day so they meet their academic and personal goals. Designate time for schoolwork, creative time, as well as time to be physically active and spending some amount of time outdoors. Reserve a short time each day to contribute to family by completing chores. Let them take ownership over their time and they will be more willing to keep the schedule.

Break up the day by interspersing creative and physical activities throughout the day. Providing short breaks from school work by going for a quick walk around the block, cuddling with a pet, building with Legos or doing a short drawing tutorial online can help pace kids (and parents) so they don’t get frustrated or burned out. Leaving all the “fun stuff” for after school work is done, might seem like a way to incentivize, but I found that using these activities to break up the day as short term incentives work better for my family.

Slay your dragons before lunch. I was so proud of my youngest son for setting his schedule to get his most challenging subject out of the way first. It made all the difference for him to be able to choose that for himself and see the advantage of it rather than if I forced him to. Maybe this experience will help him manage his time later on in life.

It’s all about intention. A planned pajama day can be fun, but staying in pj’s just because of lack of motivation can be a slippery slope. Keeping a routine and having standards like: everyone has to be dressed and ready for the day by 9am on weekdays can give structure to your day that will be beneficial in the long run.

Extend grace to your kids, your children’s teachers and yourself as you navigate this unprecedented time. Even with the greatest intentions and planning we will all have moments or even entire days that don’t go well. When we have these rough times be prepared to extend grace and just do the best you can under the circumstances.

What lessons have you learned as you parent during this trying time?


Thursday, February 9, 2017

Mini Cake from a Regular Sized Oven

See recipe for mini chocolate cake below
My youngest creative little heart is always throwing birthday bashes for his stuffed animals.  He makes decorations, plans games for all their stuffed animal friends and makes and wraps gifts for them.  He often uses play food or builds a cake out of paper or legos, but this week he heard wind of a thing that his friend got: Easy Bake Oven.  I’m sure my easy bake oven is still in my parent’s basement.  I remember it with mixed feelings, the idea is so appealing, but the light bulb that heats it never really did that stellar of a job at cooking the miniature cakes and cookies and when the kit ran out of tiny mixes, the honeymoon was officially over.  I cook with my kids all the time with our boring old regular sized oven, but most recipes make a large cake or a dozen or so cupcakes which isn’t really what we need when mouse or a beany baby is celebrating.  Yesterday was decidedly Om Nom’s birthday.  If you aren’t familiar with the little green monster from the game “Cut the Rope” he is a cute friendly green monster that munches candy.  A small peppermint candy (or doughnut – there are optional settings for this) is tied by a rope and dangles out of reach.  The object of the puzzle game is to figure out how to get the treat into Om Nom’s mouth.  I found some ceramic ramekins adapted a recipe to make the perfect cake for Om Nom.   Below is the recipe so you can also help your little creative one bake a miniature cake for a pretend tea party or birthday bash for their favorite stuffed animal.  Have fun letting your creative little heart celebrate.

Mini Chocolate Cake makes two 3 ½ inch cakes

Ingredients:
1/3 c. flour
1/8 tsp corn starch
3 Tb granulated sugar
2 Tb unsweetened cocoa powder
¼ tsp baking soda
¼ tsp salt
1 Tb vegetable oil
¼ tsp vanilla
¼ c. milk
1 tsp white vinegar

Directions:
Preheat oven to 350 degrees
spray ramekins with baker’s non-stick spray with flour
whisk together dry ingredients pour in wet and stir
Bake 20-24 min
Cool 15 minutes on a rack


Buttercream Frosting:
4 Tb butter
½ tsp vanilla
pinch of salt
1 c. powdered sugar
1-2 Tb milk
Beat together
divide into small bowls and add food coloring to make different colors
frost cooled cake

Enjoy!

Monday, September 26, 2016

Tips and Tricks for Painting a Map on Pavement

This weekend I had the opportunity to work with a group of volunteers in painting a large map on the paved portion of the playground behind the local elementary school.  I struggled to find helpful resources online for such an endeavor and so I’m writing this to help communities that want to do a similar project. 

Below you will find my ideal timeline for planning and executing my project.  I ran into a little kink the day of my project because you have to prep your painting area (which takes one person with a leaf blower). It also only takes a few people to place the template and mark it with spray paint.  If you don’t want to have eleven people watching one person use the leaf blower, designate someone to do that ahead of time, have a handful of people place and mark the template and then schedule the rest of your painters to come.

Pro Tip: Schedule people to come when you need them so fewer people are standing around with nothing to do.

Sample schedule for the morning of the painting project:
8:00 am:               Two people unload and organize supplies and leaf blow painting area
8:30 am:               Two additional people come help layout template and mark it with spray paint
9:00 am:               Additional painters arrive to paint the map.

Pro Tips for using a map template:
  1. Take off your shoes before walking on the template.
  2. Unroll one strip at a time and tape it down as you go.  The slightest breeze will blow the template and possibly mangle it!
  3. Hold down the edges with orange traffic cones
  4. Consider how you want to place Hawaii and Alaska before you start marking with spray paint
  5. Use contrasting color marking spray paint to mark the template onto the pavement (orange or a neon color work best)


The next kink was that the pavement we were painting on is not new.  Even thought I had in my head that we were painting on black top, it is not black…it’s light gray with white flecks.  So the white marking paint I’d purchased didn’t show up.  We were able have a couple people from the neighborhood run to their garages and find a variety of spray paint to try, and we found some that worked.  But this delayed the project a bit. 

Pro Tip: be hospitable.  Bring bottled water or coffee and donuts, if you run into a kink and someone has to run to the hardware store you can keep your painting crew from turning into an angry mob by offering baked goods.  Thankfully our principal covered the hospitality part of our project for us!

I split my workers into pairs and small groups.  Each group was assigned a color.  Several copies of a color map on clipboards were distributed for people to refer to in order to decipher the template borders that were more complex. 

Pro Tip: Have one person who isn’t painting who can walk around checking borders as painters are working.  It is sometimes hard to see mistakes when you are up close to the map you are painting. 

Having someone stand back to see the big picture can help.  Choose someone who can kindly point out where adjustments need to be made.

We set up a drop cloth on a level place where people can pour paint into their trays.  Drips and spills, while they are good to avoid will inevitably happen no matter how careful people are.  Keep some rags and paper towels handy.  The problem with painting on pavement is that it is usually not smooth.  We had one particularly bad spill by the Great Lakes.  We discussed making the lakes larger and greater or attempting to clean it up…one super helpful dad was willing to run to his house to get a wire brush to scrub the spot clean. 

Pro Tip: Have a wire brush on hand.  If someone spills, sop up the excess paint, dilute with water and scrub with a wire brush. 

It was great to have a variety of sizes of brushes and rollers on hand.  I would recommend having people outline their state or area with a small brush and then fill in with a large brush or small roller.  Rollers speed up the process of filling in shapes.

Pro Tip: ask volunteers to bring a foam pad that can be found in the gardening section of the hardware store, or an old towel folded up, to sit on or cushion their knees.

Be sure to take before, in progress and after photos to document your project.  It’s a great way to share with the community the improvements you’ve made.  Also, take time to thank your volunteers and others who helped fund or otherwise made your project possible.


Here is my ideal timeline for coordinating a project like this. 

Six months ahead: have the school contact appropriate people to approve the project. 
Several months ahead: ask for funds for the project, allow more time if fundraising will have to be done. 
Eight to six weeks ahead: set a date and raindate for the project and recruit volunteers.
And order a map template.
A week or two before the project: collect materials and put in an order for paint. 
A day or two ahead: hose off area to be painted.  Morning of painting project (or the evening before) use a leaf blower to remove loose gravel, dust, dirt, leaves etc from the area. 
Set up template spray paint the perforations in the template with a contrasting color.
Day of painting project: Have your team assemble to paint.  Plan on 3-5 hours to paint the map depending on how many volunteers you have.

FAQ
How much paint do I need?
The directions that came with my map template recommended one gallon per color to paint the USA map.  The age and quality of the pavement you are painting will matter.  The paint store where I asked said 1 gallon would cover 100 – 400 square feet…so not real helpful… we used a gallon of each of the five colors (to have no two touching states be the same color) and a qt. of blue for the great lakes.
What kind of paint should I use?
The map template I used recommended using a water based acrylic paint.  There are a variety of masonry and cement paints available but don’t necessarily come in a variety of bright colors that appeal to the students.  There are some traffic paints or striping paints available that come in basic colors (white, yellow, red, blue) Call your local paint store and ask what they recommend.
How many volunteers do I need?
I had scheduled two shifts of about a dozen people at each shift.  If you have many more people than that it gets tricky trying to fit everyone on the map at once while coordinating placing paint etc.  I would recommend no more than 12 at one time.
How long will it take to paint it?
It took a dozen people four hours to paint a USA map during our painting project.
How long does the paint take to dry?
Read the instructions on your paint can, but the paint typically dries quickly if the weather is nice and if there is sunshine and a nice breeze.  The paint takes longer to cure so avoid walking on it and definitely driving on it for at least 24 hours.
How many coats does it take?
It depends on the color and how thickly your painters are applying paint.  We found that the red required two coats and the yellow could also use a second coat. 
Does the pavement need to be primed?
We did not prime our pavement but added a second coat if necessary.
Do you need to prep the surface before painting?
Yes, it is ideal to be able to hose or pressure wash the surface a day or two ahead of time.  If that is not possible at least use a leaf blower to remove loose gravel, dust, dirt and leaves.  Sweeping wasn’t recommended because it can just drive dirt deeper onto crevices.
Should we add abbreviations, labels, state capitals etc?
It’s up to you, but there are lots of activities kids can do with chalk or props on your map mural.  I’d recommend making a platform for their imaginations leaving room for their own creativity.

What supplies do I need?
Acrylic Enamel Paint
Paint Brushes of a variety of sizes
Small Rollers
Large Rollers
Wire Brush
Water
Rags
Paper towels
Wet Wipes
Garbage bag/can
Plastic Shopping Bags (wrap brushes and rollers when they are not in use to keep them from drying out)
Paint Trays and Liners
Drop Cloth
Old Towel or Foam Knee Pads
Scraps of Cardboard (to put under paint cans)
Paint Can Openers
Paint Stir Sticks
Painter’s Tape
Masking Tape
Color copies of the map you are painting on clipboards so they don’t blow away


If you have any questions about my community’s project or your own project please feel free to leave a comment below and I will do my best to help you out!  Good luck on your project, your creative little hearts will surely enjoy playing and learning on the colorful map you paint!

Sunday, September 18, 2016

Make and Take: Stamped Orchard Landscapes

I recently facilitated a “make and take” craft at a local orchard.  When looking for an idea I start with the theme of the event and look for something that would have a high success rate with a range of ages (in this case: preschoolers through elementary school and maybe a few middle schoolers) .  I also prioritize how messy the craft will be.  I prefer something that they can walk away from the table with.  Something that will go directly into their car and the interior won’t end up smeared with wet paint or glue.  So that limits me some, but the simplicity is really important to how successful the craft is and how the parents will remember it. 
                So this weekend I was at an apple festival.  The most obvious craft: apple printing…but paint is messy, maybe we could use some sort of stamp pad?  But also most kids have done apple printing in preschool or kindergarten.  So I moved on.  Many of the crafts I came across would require collecting massive amounts of soda bottles or cardboard tubes.  Another requirement for my craft is minimal preparation.  If I don’t have to spend hours searching for supplies or cutting out things all the better!  After all for this event I’m planning for 150 kids.

                I had access to crayons and markers (both washable and met my less mess requirement.)  I am going to be on a working farm with 300 acres of orchard trees and veggies growing.  This particular Saturday there will be hay rides, face painting and the corn maze will be open.  Most kids get excited about tractors.  I had a tractor stamp from a birthday party I did for my kids a handful of years ago.  That’s when it came to me: stamped orchard landscapes. 
                When I went to the craft store to buy paper I checked out their stamps and on an end cap I found some Halloween themed rubber stamps.  There was one with a gnarled tree silhouette.  Without leaves it was a spooky tree you’d see in the front lawn of a haunted house but I could imagine adding leaves and apples with crayons and markers and it became a friendly little apple tree.  Sweet!
                
As the kids arrived I had them either stamp a bunch of trees and then add the ground or start with the horizon line and then stamp a row of trees across it.  Then most kids added the tractor or two.  Some drew hay wagons behind the tractor, one was a double decker wagon and the kids on the top could reach out and pick apples during the ride.  Some of the littlest kids went stamp happy, some landscapes turned into patterns resembling wall paper designs.  No two pictures came out exactly alike.  That’s also something I enjoy about doing art with kids, there may be a few starting points but the kids add their creative take on it, I prefer if there is some wiggle room and the project is not completely planned out.
                The craft was successful.  I had 135 kids to test it.  They came in waves of about 16 at the most.  I had two long folding tables with markers and crayons spread on each.  If possible I would recommend having a tree and tractor stamp on each table.  But we managed pretty well by sharing the stamp back and forth between the tables.  It was a great day at the orchard and I may volunteer to take it to my son’s fall classroom party next month.  Hope this gives you some tips for your next classroom party make and take craft. 

Materials:
                            White construction paper (1 per child)
                Washable Markers
                Crayons
                Tree rubber stamp
                Tractor rubber stamp

                Washable stamp pads (I used black, red and green)
                Wet wipes (for cleaning hands and rubber stamps)

Tuesday, April 5, 2016

Signs of Spring Photo Walk

This morning I wanted to snap some pictures of the fruit blossoms at our local orchard.  Since my youngest creative little heart doesn't have school until the afternoon he had to tag along.  To make it more interesting for him I let him use one of our old digital cameras.  I showed him the basic functions along with some simple rules like don’t touch the lens, always keep the strap around your wrist, and don't look through the viewfinder while you are walking.  Then we headed out to the orchard to find signs of spring!

What started out as a way to keep him occupied (and from getting whiny) ended up putting some other skills to good use.  He was able to read the label on the on/off button and count down the number of pictures he had left.  He learned the terms zoom, focus and point of view.  There was a beautiful clear sunny sky today, but the temperature was unseasonable chilly.  Even though our walk was somewhat short we ended up with some nice photos.  

If you have an old camera or cell phone with a camera feature lying around, put it good use by letting your little creative hearts snap some photos with it. They will be so proud of the pictures they take!


Here's what my creative little heart came up with.


Monday, February 8, 2016

Making vs Buying Valentines

Ah, it’s time for Valentine ’s Day parties in the elementary school again.  Getting my kindergartener to get Valentines ready for his classmates made me think about what it was like a few short years ago when my oldest had to do it.  Getting my oldest son to write his name 24 times when he was in kindergarten was grueling.  Seriously painful.  He hated it.  It took us days.  I tried to make it more fun for him by letting him pick out any store bought kit he wanted.  He ended up with a popular cartoon character that boasted free temporary tattoos.  I rationed them out over several days so he only had to do a few at a time.  In the end I was able to appreciate how his handwriting improved and how it had gotten easier.  (He was just glad they were done and that he got to keep the extra tattoos.)  Last year he was into rainbow loom bracelets so he made them for the whole class and I taught him how to use publisher to layout a card to go with them.  There are so many cute ideas out there on Pinterest, but I resisted the urge to take over and follow the latest trend this year.  I really want the valentines to be their own, something that they are excited to give their friends and classmates. I left it totally open to them.  

One child chose to buy his valentines, the other was super excited to make his.  My husband and I overheard them talking about their valentines.  Each child thought that what they were doing was better.  That’s when my husband brilliantly interjected that they should use “I statements”.  For example, instead of saying: “Making your own valentines is better than buying them!”  Try saying: “I enjoy making my own valentines because I like to draw.”  Or instead of saying: “My valentines are cooler.” Say: “I think my friends are going to like getting the valentines I picked out for them.”  It worked amazingly well! 
Working on fine motor and organizational skills here!

Saturday each boy set up a spot to work on their valentines.  My youngest stuck with it and made a unique card for each member of his class.  I did lay some ground rules.  He chose colored construction paper which I cut in half on the paper cutter so each card was the same size.  He then could cut, glue and draw to his heart’s content as long as each one had his name and his classmates name on it.  It was great for his cutting skills, I was pretty impressed with the hearts he was cutting out by himself by the end!  He also kept track of who he made valentines for and crossed them off his list as he went.  It was pretty exciting to see these organizational skills come together!

My oldest resisted the task of completing the valentines so early in the week at first, but once he got started he said it was actually fun to do.  (And I don’t have to worry about him staying up late the night before while he completes them last minute.)  He went to the store with his dad and chose a cute kit with a scratch off heart that concealed the message on the card. He carefully taped a penny to each one so that his classmates could scratch off the heart on their card right away.


In the end both kids were excited to give away their valentines and I hope learned valuable organizational and people skills in the process.  Using “I” language instantly changed their attitude, making positive statements that expressed their opinions instead of nasty comparisons that put others down.  I think more adults should put this into practice.  What do you think?

Sunday, October 25, 2015

Dynamic Frames: review of Lil' Davinci Art Gallery


I’ve been on a quest to find an easy attractive way to display my kid’s artwork.  I’ve used a clothes line and clothes pins, which was cute in their toy room, but it didn’t give the clean look I wanted.  I tried putting up traditional frames and changing their artwork in them as they came home from school, but messing with traditional frames and glass was so cumbersome that I never ended up changing the artwork.  Last year I took a tour of Hershey Medical Center with the coordinator of artistic improvement.  Part of her job is to enhance the environment in the hospital.  She does this by painting murals and hanging artwork.  In some of the patient rooms they had built frames that they could easily switch out the artwork.  They even had a collection of art prints and patients were able to look through the collection on an ipad and choose the picture that would hang at the foot of their bed.  They got to choose what they looked at during their hospital stay!  She painted ceiling tiles with whimsical outdoor themes in the children’s hospital to give bed ridden young patients something to look at.  In one hallway she showed me some frames from Dynamic Frames that were hinged on one side.  They swing open allowing you to press in a new piece of art and store old pieces.  It was so easy and the spring loaded mechanism kept the image pressed neatly to the mat and glass.  It was neat, clean and easy. Plus it can hold up to 50 pieces of art!  It was the solution I had been looking for in my home!  I asked for a set of these last Christmas and love them!  They were easy to hang and can be hung horizontally or vertically.  Adding new artwork literally takes seconds and doesn't require any tools.   I wish I had these in the school office when I was an art teacher.  It would be an ideal way to change out seasonal art throughout the year at a school or office!

Note: Do be careful when the frame on a vertically hung art cabinet is open all the way the weight of it can tip the whole thing off it's hanger.


Saturday, March 28, 2015

Family Tree Photo Gallery

I’ve had this idea for a while: to create a family photo gallery on top of a silhouette of a tree.  First I collected all the photos that I wanted to use.  I found black frames for them with white mats.  The frames vary in size and design.  Some hold two or three photos.  Some were plain and smooth while others have a slight tapering angle to them or grooves that add some dimension and interest. 


I started by cutting out pieces of white butcher paper to match the sized frames I had.  I stuck them on the wall with blue painter’s tape that could be easily removed and repositioned on the wall without removing any paint.  I started with one large photo that would serve as a focal point, an anchor with all the other photos and elements radiating from that one.  I established a few lines within the layout to keep the photos looking organized.  I wanted an asymmetrical layout without it looking haphazard.  I thought about taking similarly sized photos and placing them on opposite sides of my imaginary horizontal and vertical lines that I’d created. 

Once my design was finalized and I had all the templates taped on the wall I used a pencil to outline the silhouette of the tree.  Then I removed the templates and painted the silhouette using paint that was one shade darker than my wall color and one finish shinier.  I was able to make my silhouette using a sample size from the paint counter.  It was a little tricky to paint because one shade darker matches the wall color when wet.  I felt like I was using invisible paint!  I painted along the pencil line, covering the pencil as I went.  As it dried it darkened a bit revealing the subtle look I was going for.
The next day, when the tree was dry I marked where the hanger needed to be for each frame and taped the paper templates back on the wall.  I hammered the picture hangers right through the paper template and then ripped the paper from the nail/hanger. 

I’m very pleased with the results and hope you can use these tips to make a personalized family photo gallery in your home!


Thursday, October 30, 2014

Man in the Yellow Hat Costume Tutorial and Free Pattern


When my boys were really little they were not fond of dressing up for Halloween in costumes that felt a lot different from regular clothing.  Anything that was too tight, too puffy or had a mask was out.  I had fun finding ways to transform regular clothing and hooded sweatshirts into costumes.  They felt comfortable in this costume which consisted of a regular button down shirt and pants with a soft comfy hat and of course their favorite monkey character!


Materials for hat and tie:
  • 1/3 of a yard Yellow Felt (72” wide off the bolt)
  • a square of Black Felt 
  • 1 1/3  yards of Fusible Midweight Interfacing (at least 12” wide)  (this will give the hat some body to help keep it’s shape so look for something not too flimsy but not too thick)
  • I” wide black gross grain ribbon (23 ½ inches long) or 1” strip of black felt
  • yellow thread
  • black thread
  • ¼” wide elastic (14 inches long)
  • Glue gun


To Make Hat:

Download Pattern Here

  1. Attach fusible interfacing to one side of the yellow felt according to manufacturer’s directions.
  2. From the felt with attached interfacing, cut three panels of yellow felt for the dome of the hat. (pictured to the right)
  3. Cut 2 circles of yellow felt with a diameter of 12”.  Place circles together with interfacing together and sew the outer edge of the circle to create the brim of the hat. 
  4. Put two of the three panels  together with right sides together and sew the seam from the point at the top to the bottom corner.  
  5. Match up the point on the third panel to the point on the other two panels (again right sides together and sew the seams on either side then turn right side out to create the dome of the hat. 
  6. To attach the dome of the hat to the brim of the hat, cut 6 ½” slits through the center of the circle leaving a 2 ½” brim.  
  7. Trim to leave 1” tabs in the inside of the hat brim.
  8. Set up the dome of the hat and gently slide the brim down from the top of the dome.  The tabs should all be sticking up against the dome.  Hand stitch or glue the tabs to the dome of the hat.
  9. Cover the tabs with black ribbon or a strip of black felt.  


Download Pattern Here
To Make the Necktie:

  1. Cut two yellow pieces from the necktie template.  
  2. Place ¼” elastic in the top of the tie and pin in place.  Be sure there is an ample amount of elastic inside the yellow tie (about an inch on each side).  
  3. Cut black accent circles.  Place the black circles on the yellow tie and sew in place.


Wednesday, September 17, 2014

Clean vs. Creativity Conundrum

I was recently commiserating with another mom about the perils of keeping the house clean with little ones.  It seems like an endless struggle.  Getting our kids to clean up after themselves seems impossible!  My cousin who has her own interior design business posted an article from house beautiful about “9 habits of people who never have to clean their house”.  (Obviously no children live in the house pictured here!)
How to Never Clean Your House  click to read full list of tips
from House Beautiful Magazine
They seem common sense enough and complaining that I can’t handle one of these seems ridiculous.  Put clothes in clothes hamper, cut down on clutter, file paperwork immediately upon opening the mail.  But in the midst of day to day survival the hours seem to slip by without much success on training my family to accomplish these tips and everything else on our plate.  

I know some parents institute rules that only one toy can be taken out at a time and that everything must be cleaned up before moving onto the next thing.  I find it to be more complex than that.  Certainly holding a child responsible for the care of their belongings is an important life skill.  And having a clutter-free, clean house is good for my family’s well-being.  But there are times that my child is so engrossed in something that he spent time building and is playing out a complex pretend scenario that is also important for his emotional and creative development.   

So my challenge: how can I balance the cultivation of creativity and extended uninterrupted playtime while also nurturing healthy cleaning habits?

One evening I got so fed up with cleaning up after my kids at every night (and the younger one had dumped an obscene number of toys on the playroom floor) that I simply locked the door and put a sign up that said “Danger” I told the boys that the room had so much on the floor that it was dangerous to walk in there and it wouldn’t be opened until they were ready to clean it up.

 Another day I tried handing my son, then in first grade, his digital camera and asking him to take a picture of the kitchen, entryway, trash can, bathroom, beds in his room shared by his little brother and the toy room.  Then we went room my room cleaning up each space and taking “after” pictures.  I then created a lift the flap poster that is still on our fridge.  This wasn’t a magical fix to our cleaning habits, but it did start the conversation and I notice my sons flip the pictures when they walk passed the fridge where it’s hanging. 

Flash cards allow kids to choose a task to keep their focus
and let them feel like they have control over cleaning up.
I’ve found that flash cards and a timer work pretty well.  Each card has a task like “pick up all the trash” or “put all the Legos in the box” and a picture that illustrates it so my preschooler who doesn’t read yet can understand it.  The cards are laid face down and my kids choose one task at a time, this gives them the feeling of control over what job they get.  Then we turn on a timer for three minutes or so and try to see who can finish their task first.  This method has worked quite well. 

I’ve also found that if I choose our clean up sessions wisely they are met with less resistance.  If I try to get my 4 year old to clean up in the middle of an elaborate pretend scenario it’s not going to be as successful than if I wait until a natural break in his playtime or a natural change in our routine for example before a meal time or when we move from outdoor play to indoor.   I give my kids the option to get special permission to keep toys out for extended times, like if they’ve built an elaborate fort or set up a play restaurant for example.  But it’s up to me to discern when it’s truly worth extended time and when it’s just a mess that they don’t want to clean up.

The latest thing that I’m continuing to work on with my kids and myself is to have everything cleaned up at least once a week.  This way I can make one sweep through the whole house to dust and vacuum without first having to put everyone’s belongings away.  This cuts down my cleaning time tremendously and keeps my basic housecleaning possible!  I also learned that I could wipe down the bathroom fixtures while the kids played in the tub.  That gets the bathroom cleaned at least on bath nights which is, no joke, a huge accomplishment for a family with two little boys!


How do you train your little creative hearts to clean up after themselves while also allowing them to engage in extended creative playtime?  Share your tried and true methods, because every care giver could use another trick up their sleeve!  And perhaps someday we can actually instill in ourselves and our kiddos the “nine habits of people who never have to clean their house”!