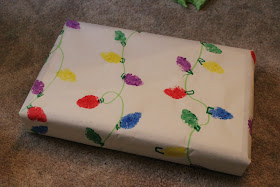
Hand Painted Wrapping Paper
My eldest son tried his hand at making wrapping paper this holiday season. We tried several methods and decided that the best paper (quick, simple and most beautiful) was stamped with sponges cut into different shapes. We started with a roll of white butcher’s paper. First we cut it to fit the package we were wrapping and wrote the name of the person it was going to lightly in pencil. We flipped the paper over onto a table, protected by a layer of newspaper, and taped the edges and corners of the butcher paper to the newspaper with a small amount of painter’s tape, so it could be easily removed later on. Then we decorated the paper with layers of stamping. Below is a list of materials, some tips for stamping with sponges and directions for making the three designs that were our favorites.
Materials:
Roll of White Butcher Paper
Pencil
Newspaper
Painter’s Tape
Paper Plates
Paints
Markers
Kitchen Sponges
Scissors
Q-tips
Small Cardboard Boxes
Foam Stickers
Wet Wipes (handy for any painting/messy project with your child)
Tips:
- If your child has a hard time getting an appropriate amount of paint onto the sponge stamp make a stamping pad by dampening a rag or inexpensive washcloth. Place the damp rag onto a paper or plastic disposable plate. Squeeze some paint onto the rag and fold to distribute the paint. This helps keeps globs and drips to a minimum.
- Have your child practice stamping on scrap paper or newspaper first to get the feel for it. The trick is to stamp straight down and pick it straight back up without sliding the sponge or stamp.
- Start from the furthest edge away from your child and work towards your child so they don’t lean over wet paint reaching for a blank spot.
- Always use washable paints and markers when working with small children and keep wet wipes within arms reach.
Snowy Paper
Stamp circles in a random fashion starting with a medium blue. Add some white to the blue and do another layer. Repeat this process adding more white paint to the paint mixture each time. We also made a stamp with a small cardboard jell-o box and a foam snow flake sticker. We finished the design by stamping blue snowflakes on the white spaces and light colored circles and white snowflakes on the blue circles.
Christmas Tree Paper
Stamp green triangles onto the paper and then decorate with colored ornaments made by stamping a q-tip in a variety of colors. A star shaped stamp made with a star foam sticker would have been nice for a tree topper (as shown in the snowy paper design).
Strings of Lights Paper
Draw some curly stripes in dark green or black leaving space in between for the lights to make the cord. We used a marker for this but paint and a brush would work too. If using paint you may want to let the paint dry before moving onto stamps. Stamp with tear drop shaped sponges. Utilize your child’s early math skills by having them make up a pattern to repeat so the colors are evenly disbursed. Once the paint has dried add a squiggle to attach the bulb to the cord.
It took much longer to wrap the gifts since you have to wait for the paint to dry in between and took up quite a bit of table space. (Every time it was time for a meal we had to check to see if the paint was dry!) But it was a lot of fun and the few special people who received gifts wrapped in hand painted paper appreciated it.


No comments:
Post a Comment